Managing tasks on a work order in the mobile app
- Tap the Work Orders icon at the bottom of the screen.
- Select the appropriate work order by tapping on it in the list. You can use the search (
 ) and filtering (
 ) options to quickly find the work order if needed.
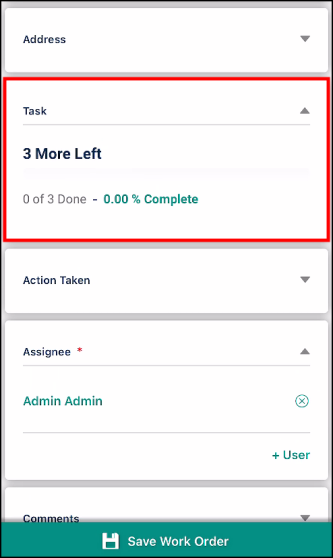
 - Scroll down to the Task card.
- If there are already tasks on the work order, you will see a progress bar representing the progress in completing all tasks currently on the work order.
- To view the tasks on the work order, tap on the Task card.

Copying a task book to a work order
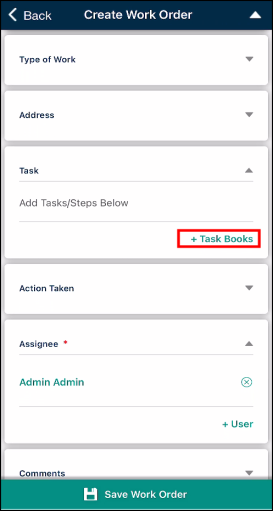
When creating or editing work orders in the mobile app, you can add previously created task books to the work order. This copies a ready-made checklist of steps into the work order that can be marked complete as the work progresses.
-
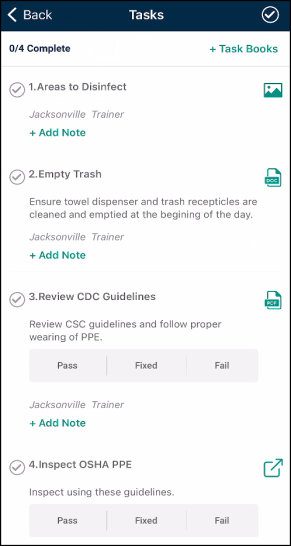
If there are no tasks listed on the work order yet, tap +Task Books to view a list of available task books that can be added to the work order.
-
If the work order already has tasks on it, tap on the Task card and then tap +Task Books in the top right corner of the task list.
-
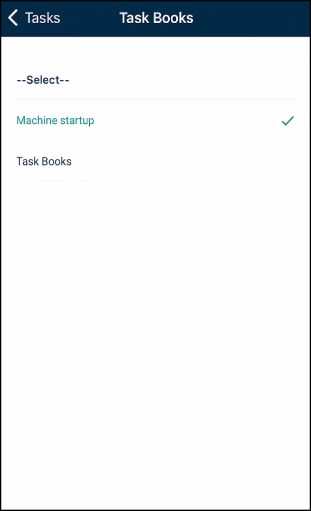
Search for the appropriate task book in the list.
-
If the task book you need does not appear in the list, go to the Settings page and tap Refresh Account Settings. This will re-download all data from the web account and bring in any new task books that have been created. *Note: This refresh happens automatically every 24 hours.
-
-
Tap on a task book to select it. All tasks within the selected task book are now copied to the work order.
-
If you need to add tasks from another task book to the work order, tap the arrow icon to go back to the Work Order Details screen and tap Save Work Order. Then repeat the steps above to select the next task book. The new tasks will follow the tasks from the first task book and will be automatically renumbered based on existing tasks on the work order.
Viewing task attachments
If an attachment was added to a task on a work order from the web, then you are able to view it in the mobile app. *Note: You cannot add attachments on tasks from the mobile app. They must be added from your Asset Essentials account on the web. Task attachments will not be available when offline on the mobile app.
- Tap on the Task card on the work order to open the list of tasks.
- Tap the icon next to the task to open the attachment.
- Document icon (
 ) - This icon allows you to view documents such as PDFs or CSV files.
 - Image icon (
 ) - This icon allows you to view images.
 - Link icon (
 ) - This icon directs you to the website of the URL provided.
 - Paper clip icon (
 ) - This icon allows you to view all other attachment types. A paper clip that has a number badge indicates the amount of attachments included and allows you to select a specific attachment from a list view.
- Document icon (
Adding notes on tasks
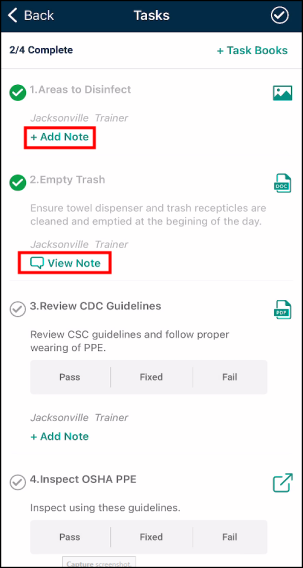
You have the ability to add notes on your work order tasks in the mobile app. This will allow you to document additional information relating to the work that is being done as you perform and complete each individual task. *Note: You will be prompted to add a Note on a Pass/Fail task when Fixed or Fail is selected.
- Tap on the Task card to open the task list.
-
Tap on + Add Note under the appropriate task.
-
Enter your note in the pop-up that is displayed.
-
Tap Add Note.
-
Tap the arrow icon to go back to the Work Order Details screen.
-
Tap Save Work Order to save the new note.
Updating an existing task note
- Tap on the Task card to open the task list.
-
Tap on View Note under the appropriate task.
-
Update the note in the pop-up that is displayed.
-
Tap Update Note.
-
Tap the arrow icon to go back to the Work Order Details screen.
-
Tap Save Work Order to save the updated note.

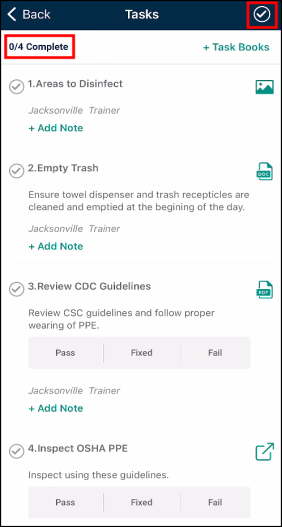
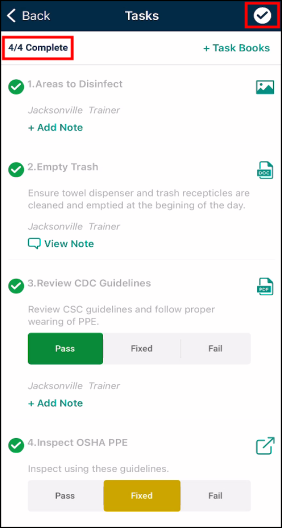
Completing tasks
- If you have completed an individual task, tap the check mark icon (
 ) next to the task.
 - Pass/Fail tasks are automatically marked complete when the selection of Pass, Fixed, or Fail is made.
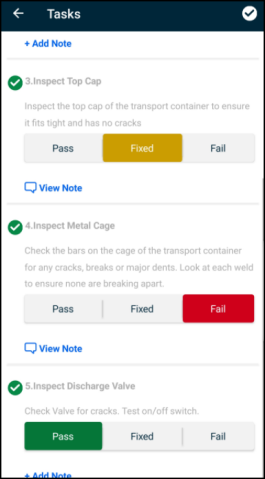
- If you have completed all tasks, tap the check mark icon (
 ) in the top right corner of the screen to mark all tasks as complete.
 - Tap the arrow icon to go back to the Work Order Details screen.
- Tap Save Work Order to finalize your changes.
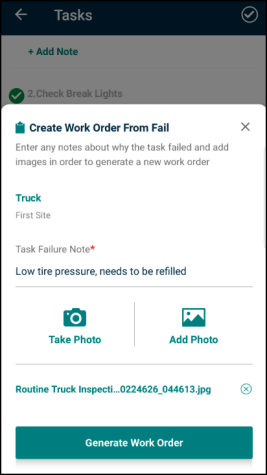
Generating a work order from a failed task
If you have a Pass/Fail task that is marked Fail, you can create a new work order right from the task for the follow-up work that needs to be done to fix the issue.
-
Select Fail from the task options.
-
The Create Work Order From Fail option displays.
-
The asset from the task will already be listed. If there is no asset on the task, the asset on the work order will be listed. *Note: If there are multiple assets or no assets listed on the work order, you will need to select an asset from the list provided to continue creating the new work order.
-
Enter a Task Failure Note. This will populate in the Work Requested field on the new work order. *Note: The first 50 characters of the Task Failure Note will also be used as the WO Title.
-
Add an attachment if needed.
-
Tap Generate Work Order.
-
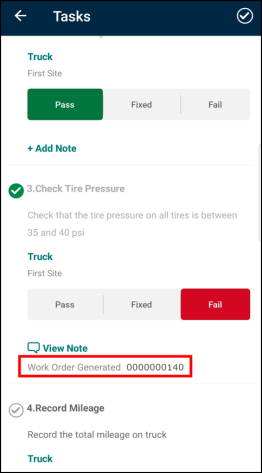
You will see a confirmation that the work order has been created and will go back to the task list on the original work order to pick up where you left off.
-
That task will show the newly generated work order number for reference.